In the previous post I explained how to create new Azure machine learning experiment and how to use linear regression to make predictions. The experiment is pretty cool itself as any other one, but there is one minor problem with it. It’s totally useless. Oh, you certainly can open it up and run all steps manually each time you need to predict profit (I’m still talking about previous post with synthetic experiment and synthetic dataset) based on city population, but, agree, it’s not very suitable. It would be nice if you had a way to store your trained model and supply data you need to analyze, and get back results.
Fortunately guys from Microsoft foresaw, that someone might want to use their ML results at the website, to predict, let’s say, what pages with kittens might be interesting to see for certain users. Something like Twitter or Facebook suggestions. So you can run the experiment, save the model you designed and publish it via Web Service. Let’s do it.
I’m publishing old experiment from the previous post with slight modifications added. This is not a puzzler game, so I’ll explain what was changed and how I did it.
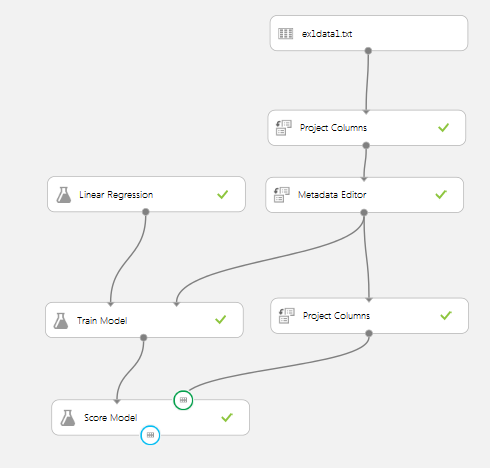
First of all I added new Project Columns task and chosen only population column to be its output or input of the Score Model task. In the previous version of the experiment there was no this task so Score Model accepted two columns from our training set, both Population and Profit. It led to incorrect Web Service contract. Since there is only one feature column we have to tell our model which one is.
Next, you’ve probably noticed blue and green circles around input and output ports of the Score Model task. I’ll talk about them later.
Next thing you need to do is to save your trained mode. So, run experiment again. After all steps are completed right click output port of the Train model task and in the drop down menu choose Save as Trained Model option. Now your model (or in other words, linear regression function coefficients) is saved and you’re almost ready to publish your experiment. Only one thing is left.
You need to specify what ports of the experiment are input and what ones are output. So right click input port of the Score Model task and choose Set as Publish Input. Do the same for the output port, but this time choose Set as Publish Output option.
Now in the large bottom menu Publish Web Service item should be enabled. If it’s not, just run experiment once again and it will be enabled. At least for me it worked fine.
Just click the button and Web Service will be created automatically. After it’s published you will be redirected to the Web Service page which looks like below. I removed API key.

So it’s time to consume the web service.
The simplest way is to create console application. So create it, then in the Stagin Services list click the row named as your web service and with type Request/Response. I’m writing in normal case. :) Don’t know who told Microsoft designers that upper case IS BRILLIANT IDEA! The sample code will be opened.
Simply follow instructions on the scree, i.e. install Microsoft.AspNet.WebApi.Client package into
console application (if you created ASP.NET application as I did, you can ignore package install step)
and copy-paste the code from the example. Don’t forged to change the API key
to the one you have at your web service configuration page. Now you can call your web service, supply data
to it and get back predicted/classified/clustered results.